DFL: エキスパンダーコントロールのサンプルコード
2026/3/26更新
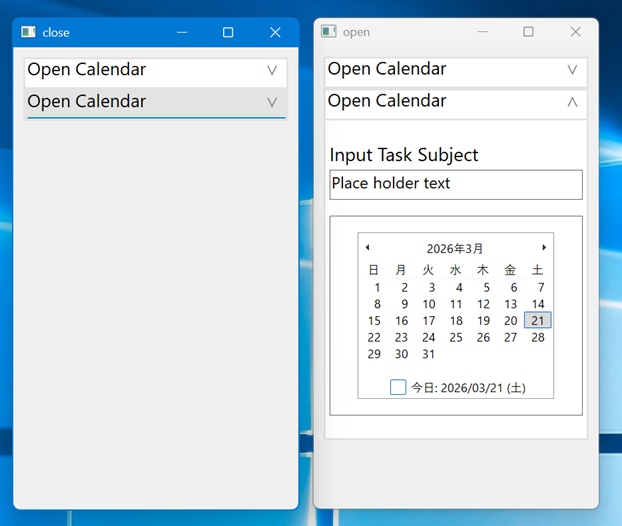
WinUI3とかにあるExpanderコントロールのシンプルなやつを実装しました。
縦方向、下向きにしか展開できませんが、使われているのはほとんどこのタイプでしょう。
WinUI3だとExpandingイベントとCollapsedイベントの2つがあるようですが、
- 開閉どちらでも発火するexpandedイベント
- ExpanderExpandedEventArgsのプロパティisExpanded
があったら事足りるのでそれだけ実装しています。
仕組み
Expanderはこのような構造になっています。
- コントロール本体
- ヘッダーパネル
- コンテンツパネル
ヘッダーパネルをクリックするとコンテンツパネルが開閉します。
コンテンツパネルに子コントロールをDockStyle.TOPで追加していけば、 すべての子コントロールが表示できるだけの高さに自動的に拡張されます。
ヘッダーパネルもパネルなので同じことはできますが、
ライブラリ側では特にサイズの補正はしていません。
とりあえずヘッダーとなる文字を表示することだけに特化しています。
文字サイズくらいは設定できるようにした方がよさそうです。
文字サイズを変更できるようにしてDPIに関するバグも修正しました。
サンプルコード
import dfl;
import dfl.internal.dpiaware;

class MainForm : Form
{
    Expander[] _expanders;

    this()
    {
        this.text = "Expander example";
        this.size = Size(300, 500);
        this.dockPadding.all = 10;

        final Expander makeExpander()
        {
            Expander e = new Expander();
            e.dock = DockStyle.TOP;
            e.parent = this;

            e.header.text = "Open Calendar";
            e.header.font = new Font("Segoe UI", 14.0f);

            Label caption = new Label;
            caption.autoSize = true;
            caption.text = "Input Task Subject";
            caption.font = new Font("Segoe UI", 14.0f);
            caption.dockMargin.top = 16;
            caption.dockMargin.bottom = 4;
            caption.dock = DockStyle.TOP;
            caption.parent = e.content;

            TextBox textbox = new TextBox;
            textbox.text = "Place holder text";
            textbox.font = new Font("Segoe UI", 12.0f);
            textbox.size = Size(300, 30);
            textbox.dockMargin.bottom = 16;
            textbox.dock = DockStyle.TOP;
            textbox.borderStyle = BorderStyle.FIXED_SINGLE;
            textbox.parent = e.content;

            MonthCalendar cal = new MonthCalendar;
            cal.dock = DockStyle.TOP;
            cal.parent = e.content;

            e.expanded ~= (Expander c, ExpanderExpandedEventArgs e) {
                this.text = e.isExpanded ? "open" : "close";
            };

            return e;
        }

        _expanders ~= makeExpander();
        _expanders ~= makeExpander();
    }
}

void main()
{
    Application.enableVisualStyles();
    Application.setHighDpiMode(HighDpiMode.PER_MONITOR_V2);
    Application.run(new MainForm());
}
DFL のダウンロード
DUB のパッケージ
DFL: 日時選択コントロールのサンプルコード

日時選択コントロール(DateTimePicker)を実装しました。
日時選択コントロールは、 カレンダーコントロールと同じくオリジナルDFLのTODOに挙げられていたので、 いつかは実装しようと思っていたのですが、 コモンコントロールの日時選択コントロールは 使い勝手が気に入らなかったので後回しにしていました。
GitHubのIssueに投稿があったので、重い腰を上げた次第。
ちなみにカスタム書式の書式指定方法はこちらをどうぞ。
サンプルコード
import dfl;

import std.datetime;

class MainForm : Form
{
    DateTimePicker _dt;
    Button _checkBoxButton;
    Button _upDownButton;
    Button _longFormatButton;
    Button _shortFormatButton;
    Button _customFormatButton;
    Button _timeFormatButton;
    StackPanel _datetimePanel;
    StackPanel _commandPanel;

    this()
    {
        this.text = "DateTimePicker example";
        this.size = Size(500, 300);

        _datetimePanel = new StackPanel;
        _datetimePanel.parent = this;
        _datetimePanel.borderStyle = BorderStyle.FIXED_SINGLE;
        _datetimePanel.size = Size(300, 100);
        _datetimePanel.dock = DockStyle.TOP;

        _commandPanel = new StackPanel;
        _commandPanel.parent = this;
        _commandPanel.borderStyle = BorderStyle.FIXED_SINGLE;
        _commandPanel.size = Size(300, 50);
        _commandPanel.dock = DockStyle.TOP;
        _commandPanel.orientation = Orientation.HORIZONTAL;

        _checkBoxButton = new Button;
        _checkBoxButton.text = "CheckBox";
        _checkBoxButton.click ~= (Control c, EventArgs e) {
            _dt.showCheckBox = !_dt.showCheckBox;
        };
        _commandPanel.add(_checkBoxButton);

        _upDownButton = new Button;
        _upDownButton.text = "UpDown";
        _upDownButton.click ~= (Control c, EventArgs e) {
            _dt.showUpDown = !_dt.showUpDown;
        };
        _commandPanel.add(_upDownButton);

        _longFormatButton = new Button;
        _longFormatButton.text = "Long";
        _longFormatButton.click ~= (Control c, EventArgs e) {
            _dt.format = DateTimePickerFormat.LONG;
        };
        _commandPanel.add(_longFormatButton);

        _shortFormatButton = new Button;
        _shortFormatButton.text = "Short";
        _shortFormatButton.click ~= (Control c, EventArgs e) {
            _dt.format = DateTimePickerFormat.SHORT;
        };
        _commandPanel.add(_shortFormatButton);

        _customFormatButton = new Button;
        _customFormatButton.text = "Custom";
        _customFormatButton.click ~= (Control c, EventArgs e) {
            _dt.format = DateTimePickerFormat.CUSTOM;
            _dt.customFormat = "yyyy'/'MM'/'dd HH':'mm':'ss";
        };
        _commandPanel.add(_customFormatButton);

        _timeFormatButton = new Button;
        _timeFormatButton.text = "Time";
        _timeFormatButton.click ~= (Control c, EventArgs e) {
            _dt.format = DateTimePickerFormat.TIME;
        };
        _commandPanel.add(_timeFormatButton);

        _dt = new DateTimePicker();
        _dt.parent = _datetimePanel;
        _dt.size = Size(300, 21);
        _dt.valueChanged ~= (Control c, EventArgs e) {
            if (_dt.value.month != 4)
                _dt.value = DateTime(2027, 4, 1);
            this.text = _dt.value.toISOString;
        };

        this.load ~= (Control c, EventArgs e) {
            _dt.dateMin = DateTime(2026, 4, 1);
            _dt.dateMax = DateTime(2027, 5, 10);
        };
    }
}

void main()
{
    Application.enableVisualStyles();
    Application.setHighDpiMode(HighDpiMode.PER_MONITOR_V2);
    Application.run(new MainForm());
}
DFL のダウンロード
DUB のパッケージ
DFL: カレンダーコントロールのサンプルコード

カレンダーコントロール(MonthCalendar)を実装しました。
カレンダーコントロールは、オリジナルDFLのTODOに挙げられていたので、 いつかは実装しようと思っていたのですが、 コモンコントロールのカレンダーコントロールは 使い勝手が気に入らなかったので後回しにしていました。
ビジュアルスタイルが適用されてから多少見栄えはマシになったみたいなのと、 GitHubのIssueに投稿があったので、重い腰を上げた次第。
サンプルコード
import dfl;

import core.sys.windows.commctrl;
import core.sys.windows.winbase;
import core.sys.windows.windef;
import core.sys.windows.winuser;

import std.conv;
import std.datetime;

class MainForm : Form
{
    MonthCalendar _cal;

    this()
    {
        this.text = "MonthCalendar";
        this.size = Size(400, 400);

        _cal = new MonthCalendar();
        _cal.parent = this;

        _cal.dateChanged ~= (MonthCalendar c, DateRangeEventArgs args) {
            text = "Date changed: " ~ args.start.toISOExtString ~ " - " ~ args.end.toISOExtString;
        };
        _cal.dateSelected ~= (MonthCalendar c, DateRangeEventArgs args) {
            text = "Date selected: " ~ args.start.toISOExtString ~ " - " ~ args.end.toISOExtString;
        };
        _cal.mouseDown ~= (Control c, MouseEventArgs e) {

            enum mode = 2; // ここの数字を変更すると色々な機能の実験を切り替えられます。

            switch (mode)
            {
            case 0:
                text = _cal.calendarDimensions.to!string;
                break;
            case 1:
                DayOfWeek dow = _cal.firstDayOfWeek;
                text = dow.to!string;
                break;
            case 2:
                DateTime minRange = _cal.minDate;
                DateTime maxRange = _cal.maxDate;
                text = minRange.toISOExtString ~ " - " ~ maxRange.toISOExtString;
                break;
            case 3:
                uint count = _cal.maxSelectionCount();
                text = count.to!string;
                break;
            case 4:
                POINT pt;
                GetCursorPos(&pt);
                ScreenToClient(handle, &pt);
                const HitTestInfo hi = _cal.hitTest(Point(&pt));
                text = hi.to!string;
                break;
            case 5:
                auto range = _cal.selectionRange();
                text = range.start.to!string ~ ", " ~ range.end.to!string;
                break;
            case 6:
                text = _cal.todayDate.to!string;
                break;
            case 7:
                _cal.calendarDimensions = Size(2, 2);
                text = _cal.calendarDimensions.to!string;
                break;
         default:
                const(SelectionRange) range = _cal.getDisplayRange(true);
                text = range.start.toISOExtString ~ ", " ~ range.end.toISOExtString;
            }

            _cal.showToday = true;
            _cal.showTodayCircle = true;
            _cal.showWeekNumbers = true;
            _cal.todayDateSet = false;
        };

        load ~= (Form f, EventArgs e) {
            _cal.firstDayOfWeek = DayOfWeek.mon;
            assert(_cal.firstDayOfWeek == DayOfWeek.mon);

            _cal.minDate(DateTime(2026, 4, 1));
            _cal.maxDate(DateTime(2026, 9, 1));

            _cal.setDate(DateTime(2026, 4, 1));

            _cal.selectionRange(new SelectionRange(DateTime(2026, 4, 10), DateTime(2026, 4, 12)));

            _cal.todayDate = DateTime(2026, 4, 3);

            _cal.maxSelectionCount = 3;
            _cal.scrollChange = 2;

            _cal.boldedDates = [
                DateTime(2026, 5, 1),
                DateTime(2026, 5, 2),
            ];

            // _cal.removeAllBoldedDates();

            _cal.removeBoldedDate(DateTime(2026, 5, 1)); // 登録されている 2026-05-01 を削除します。

            _cal.monthlyBoldedDates = [
                DateTime(2026, 4, 27),
                DateTime(2026, 4, 28),
            ];

            // _cal.removeAllMonthlyBoldedDates();

            // 登録されていない 2025-03-28 ではなく、登録されている 2026-04-28 を削除します。
            _cal.removeMonthlyBoldedDate(DateTime(2025, 3, 28));

            _cal.annuallyBoldedDates = [
                DateTime(2026, 6, 10),
                DateTime(2026, 6, 11),
            ];

            // _cal.removeAllAnnuallyBoldedDates();

            // 登録されていない 2025-06-10 ではなく、登録されている 2026-06-10 を削除します。
            _cal.removeAnnuallyBoldedDate(DateTime(2025, 6, 10));

            _cal.dateBold ~= (MonthCalendar m, DateBoldEventArgs e) {
                if (e.year == 2026 && e.month == 6 && e.day == 1)
                {
                    e.isBold = true;
                }
            };
            _cal.annuallyDateBold ~= (MonthCalendar m, AnnuallyDateBoldEventArgs e) {
                if (e.month == 7 && e.day == 1)
                {
                    e.isBold = true;
                }
            };

            _cal.backgroundColor(Color.white);

            // これらは enableVisualStyles を使用していない場合だけ有効です。
            // _cal.titleForeColor(Color.green);
            // _cal.titleBackColor(Color.yellow);
            // _cal.trailingForeColor(Color.blue);
            // _cal.monthColor(Color.purple);
        };
    }
}

void main()
{
    Application.enableVisualStyles();
    Application.setHighDpiMode(HighDpiMode.PER_MONITOR_V2);
    Application.run(new MainForm());
}
DFL のダウンロード
DUB のパッケージ
DFL: FolderBrowserDialogの内部実装をIFileDialogに変更

これまではフォルダ選択ダイアログFolderBrowserDialogの実装にはSHBrowseForFolder APIを使っていましたが、 あまりにもレガシーなので、モダンなIFileDialogベースの実装に置き換えました。
この間のD言語 AdC 2025で作ったコードを流用しています。
FolderBrowserDialogを使っていればデフォルトでIFileDialog(右図)が使われますが、 コンストラクタで設定すれば従来のレガシーなダイアログ(左図)も使えます。
利用側の影響が少ないようにインタフェースを変更せず内部実装だけ切り替えるようにしましたが、 実のところSHBrowseForFolderにはあってIFileDialogにはない機能が多々あったので、 従来のメソッドを呼びだしても何も実行されないメソッドがほとんどになっています。
DFL のダウンロード
DUB のパッケージ

D言語でMicrosoft Component Object Model (COM) を使う (その20)
D言語 Advent Calendar 2025 25日目の記事です。
今回は全20回の記事の締めくくりとなります。
- COM使う編
- D言語でMicrosoft Component Object Model (COM) を使う (その1) - ...ing logging 4.0
- D言語でMicrosoft Component Object Model (COM) を使う (その2) - ...ing logging 4.0
- D言語でMicrosoft Component Object Model (COM) を使う (その3) - ...ing logging 4.0
- D言語でMicrosoft Component Object Model (COM) を使う (その4) - ...ing logging 4.0
- D言語でMicrosoft Component Object Model (COM) を使う (その5) - ...ing logging 4.0
- D言語でMicrosoft Component Object Model (COM) を使う (その6) - ...ing logging 4.0
- COM作る編
- D言語でMicrosoft Component Object Model (COM) を使う (その7) - ...ing logging 4.0
- D言語でMicrosoft Component Object Model (COM) を使う (その8) - ...ing logging 4.0
- D言語でMicrosoft Component Object Model (COM) を使う (その9) - ...ing logging 4.0
- D言語でMicrosoft Component Object Model (COM) を使う (その10) - ...ing logging 4.0
- D言語でMicrosoft Component Object Model (COM) を使う (その11) - ...ing logging 4.0
- ComPtr作る編
- D言語でMicrosoft Component Object Model (COM) を使う (その12) - ...ing logging 4.0
- D言語でMicrosoft Component Object Model (COM) を使う (その13) - ...ing logging 4.0
- D言語でMicrosoft Component Object Model (COM) を使う (その14) - ...ing logging 4.0
- D言語でMicrosoft Component Object Model (COM) を使う (その15) - ...ing logging 4.0
- D言語でMicrosoft Component Object Model (COM) を使う (その16) - ...ing logging 4.0
- WinRT使う編
- 総括
その1でCOMインタフェースを使うために必要な宣言や定義の準備ができて、 その2でCOMの初期化と解放ができるようになりました。 その3では実際にファイルを開くダイアログを表示することができ、その4では選択したファイルのパスを取得できました。 その5ではQueryInterfaceを使って別のCOMインタフェースを取得して、ファイル作成日時を取得できました。 その6ではCOMインタフェースをアップキャストもダウンキャストもできないことを説明しました。
その7ではCOMオブジェクトとCOMインタフェースを自作するための準備をしました。 その8とその9では自作COMファクトリをCOMサーバーとして登録し、 自作COMオブジェクトと自作COMインタフェースを作成できました。 その10では既存のCOMインタフェースを拡張した新しいCOMインタフェースとCOMオブジェクトを作成しました。 その11では、COMファクトリクラスを拡張して、新しいCOMインタフェースを使えました。
その12では、AddRefメソッドとReleaseメソッドを自分で呼ばなくていいように ComPtrというスマートポインタを作ることにしましたが、 その13では構築と破棄を同じ回数捉えることができませんでした。 その14ではコピーコンストラクタだけでスマートポインタを作る実験をしました。 その15ではComPtrを実際に使うことができました。 その16ではComPtrにasメソッドを追加してQueryInterfaceを隠ぺいしました。
その17ではCOMの基盤の上に作られているWinRTをD言語で使う準備をしました。 その18では、WinRTインタフェースを使いましたがアプリが一瞬で終了してしまいました。 その19ではメッセージループを追加し、WinRTを使ってメッセージダイアログを正しく表示できました。
総括
始まりはここからでした。
DFL with WinRTを試していて、D言語はCOMを使うのに向いていると思ったので、D言語でのCOMの使い方をだらだら書いて行きます。
D言語がCOMを使うのに向いていると感じるのはなぜかを考えてみると、 どちらもネイティブコードなので、親和性が高いのかなと思います。 C#のマーシャリングとかで謎の属性が大量に付いているとか、 そういうのがほとんどなく、コードがスッキリしていて明快です。
逆に、D言語でCOMを使うときに一番ネックになるのは、
D言語コンパイラに付属されているcore.sys.windows.*が古くて、
Vista以降に追加されたAPIが定義されていないことでしょう。
本来であればC/C++のヘッダーを自動変換して生成するのでしょうが、
特定のAPIしか使わないなら人力で変換してもなんとかなることを実演しました。
強いて言えば、注意が必要なのは、extern(Windows)を忘れないことと、
引数のポインタの数くらいですかね。
一方、WinRTまで進むと、投影(プロジェクション)なしに、生のWinRTを使うのは無理が出てきますね。 特に、非同期処理に手ぶらで挑むのは厳しそうでした。 C#のawaitや、C++/WinRTのco_awaitに相当する仕組みを、D言語にも用意してやれば使い勝手はよくなるでしょう。
WinRTのD言語プロジェクションであるdwinrtを使えば、 その辺りはフォローされているので、興味があれば試してみてください。
拙作のD言語用Windows GUIライブラリDFLは、 dwinrtと一緒に使うこともできますよ。
それでは!
D言語でMicrosoft Component Object Model (COM) を使う (その19)
D言語 Advent Calendar 2025 24日目の記事です。
- COM使う編
- D言語でMicrosoft Component Object Model (COM) を使う (その1) - ...ing logging 4.0
- D言語でMicrosoft Component Object Model (COM) を使う (その2) - ...ing logging 4.0
- D言語でMicrosoft Component Object Model (COM) を使う (その3) - ...ing logging 4.0
- D言語でMicrosoft Component Object Model (COM) を使う (その4) - ...ing logging 4.0
- D言語でMicrosoft Component Object Model (COM) を使う (その5) - ...ing logging 4.0
- D言語でMicrosoft Component Object Model (COM) を使う (その6) - ...ing logging 4.0
- COM作る編
- D言語でMicrosoft Component Object Model (COM) を使う (その7) - ...ing logging 4.0
- D言語でMicrosoft Component Object Model (COM) を使う (その8) - ...ing logging 4.0
- D言語でMicrosoft Component Object Model (COM) を使う (その9) - ...ing logging 4.0
- D言語でMicrosoft Component Object Model (COM) を使う (その10) - ...ing logging 4.0
- D言語でMicrosoft Component Object Model (COM) を使う (その11) - ...ing logging 4.0
- ComPtr作る編
- D言語でMicrosoft Component Object Model (COM) を使う (その12) - ...ing logging 4.0
- D言語でMicrosoft Component Object Model (COM) を使う (その13) - ...ing logging 4.0
- D言語でMicrosoft Component Object Model (COM) を使う (その14) - ...ing logging 4.0
- D言語でMicrosoft Component Object Model (COM) を使う (その15) - ...ing logging 4.0
- D言語でMicrosoft Component Object Model (COM) を使う (その16) - ...ing logging 4.0
- WinRT使う編
その1でCOMインタフェースを使うために必要な宣言や定義の準備ができて、 その2でCOMの初期化と解放ができるようになりました。 その3では実際にファイルを開くダイアログを表示することができ、その4では選択したファイルのパスを取得できました。 その5ではQueryInterfaceを使って別のCOMインタフェースを取得して、ファイル作成日時を取得できました。 その6ではCOMインタフェースをアップキャストもダウンキャストもできないことを説明しました。
その7ではCOMオブジェクトとCOMインタフェースを自作するための準備をしました。 その8とその9では自作COMファクトリをCOMサーバーとして登録し、 自作COMオブジェクトと自作COMインタフェースを作成できました。 その10では既存のCOMインタフェースを拡張した新しいCOMインタフェースとCOMオブジェクトを作成しました。 その11では、COMファクトリクラスを拡張して、新しいCOMインタフェースを使えました。
その12では、AddRefメソッドとReleaseメソッドを自分で呼ばなくていいように ComPtrというスマートポインタを作ることにしましたが、 その13では構築と破棄を同じ回数捉えることができませんでした。 その14ではコピーコンストラクタだけでスマートポインタを作る実験をしました。 その15ではComPtrを実際に使うことができました。 その16ではComPtrにasメソッドを追加してQueryInterfaceを隠ぺいしました。
その17ではCOMの基盤の上に作られているWinRTをD言語で使う準備をしました。 その18では、WinRTインタフェースを使いましたがアプリが一瞬で終了してしまいました。
WinRTは非同期処理が中心
前回ラストのmain関数を再掲します。
void main()
{
    HRESULT hr = RoInitialize(RO_INIT_TYPE.RO_INIT_SINGLETHREADED);
    if (FAILED(hr)) return;
    scope(exit) RoUninitialize();

    HSTRING msgDialogFactoryClsid = toHSTRING("Windows.UI.Popups.MessageDialog");
    scope(exit) WindowsDeleteString(msgDialogFactoryClsid);
    ComPtr!IMessageDialogFactory msgDialogFactory;
    RoGetActivationFactory(msgDialogFactoryClsid, &IID_IMessageDialogFactory, cast(void**)msgDialogFactory.ptr);

    HSTRING content = toHSTRING("Hello D/WinRT!");
    scope(exit) WindowsDeleteString(content);
    HSTRING title = toHSTRING("D/WinRT Dialog");
    scope(exit) WindowsDeleteString(title);
    ComPtr!IMessageDialog msgDlg;
    msgDialogFactory.abi_CreateWithTitle(content, title, msgDlg.ptr);

    ComPtr!IInitializeWithWindow pDesktopWindow = msgDlg.as!IInitializeWithWindow(&IID_IInitializeWithWindow);
    hr = pDesktopWindow.Initialize(GetDesktopWindow());
    if (FAILED(hr)) return;

    ComPtr!(IAsyncOperation!(IUICommand)) operation;
    hr = msgDlg.abi_ShowAsync(operation.ptr); // ★非同期処理
    if (FAILED(hr)) return;
}
実はWinRTの多くの機能は非同期処理であり、
msgDlg.abi_ShowAsync(operation.ptr)
も非同期処理なのでメッセージダイアログが表示されることなく
アプリが一瞬で終了してしまっています。
C#だったらawait、C++/WinRTだったらco_awaitを使うところですが、 D言語にそれそのものはないので、この記事ではメッセージループを作って対応します。
IAsyncInfoインタフェースの取得
abi_ShowAsyncメソッドの引数で返されるIAsyncOperation!(IUICommand)オブジェクトは、 IAsyncInfoインタフェースも実装されています。
IAsyncOperation<TResult> インターフェイス (Windows.Foundation) - Windows UWP applications | Microsoft Learn
実装
IAsyncInfo
IAsyncInfoインタフェースには、メッセージダイアログの状態を取得するget_Statusがあるので、 これを使って、メッセージダイアログが終了されるまで待つことにします。
例によって、MIDLからD言語に変換したコードは、次のとおりです。 MIDLの掲載は省略します。
extern(C) extern const IID IID_IAsyncInfo;

// uuid("00000036-0000-0000-c000-000000000046")
interface IAsyncInfo : IInspectable
{
extern(Windows):
    HRESULT get_Id(uint* id);
    HRESULT get_Status(AsyncStatus* status);
    HRESULT get_ErrorCode(HRESULT* errorCode);
    HRESULT abi_Cancel();
    HRESULT abi_Close();
}

enum AsyncStatus : int
{
    Started = 0,
    Completed,
    Canceled,
    Error,
}
利用側の該当部分のコードだけ抜粋すると、こんな感じになります。
ComPtr!(IAsyncOperation!(IUICommand)) operation;
hr = msgDlg.abi_ShowAsync(operation.ptr);
if (FAILED(hr)) return;

ComPtr!IAsyncInfo info = operation.as!IAsyncInfo(&IID_IAsyncInfo);

while (true)
{
    AsyncStatus status;
    hr = info.get_Status(&status);
    if (FAILED(hr)) break;
    if (status != AsyncStatus.Started) break;

    MSG msg;
    while (PeekMessage(&msg, null, 0, 0, PM_REMOVE))
    {
        TranslateMessage(&msg);
        DispatchMessage(&msg);
    }

    Sleep(10);
}
get_StatusメソッドでAsyncStatus列挙型を取得し、それがAsyncStatus.Startedではなくなったら メッセージループから抜けます。
ちなみにPeekMessageをGetMessageに変えると正しく動きません。
また、Sleep(10);がなくてもマルチプロセッサ環境だからかOSが重たくなったりはしませんでしたが、
ChatGPTが推奨していたので一応書いておきます。
うまくいかなかった方法
別の方法として、IAsyncOperationインタフェースのset_Completedメソッドを使って メッセージダイアログの終了時に呼び出されるイベントハンドラをセットする方法もあるようです。 ただ、私が試した限り、HRESULTにCO_E_NOT_SUPPORTEDが返されて進めないので、 デスクトップアプリでは使えないのかもしれません。
完成版ソースコード全文
さあ、これで正真正銘の完成です!
D言語から生のWinRTを使ってメッセージダイアログを表示することができました。

import core.sys.windows.com;
import core.sys.windows.basetyps;
import core.sys.windows.objbase;
import core.sys.windows.winbase;
import core.sys.windows.windef;
import core.sys.windows.winuser;

pragma(lib, "windowsapp");

extern(Windows)
{
    HRESULT RoInitialize(RO_INIT_TYPE type);
    void RoUninitialize();
    HRESULT RoActivateInstance(HSTRING activatableClassId, IInspectable* thisInstance);
    HRESULT RoGetActivationFactory(HSTRING activatableClassId, REFIID iid, void** factory);
}

enum RO_INIT_TYPE : int
{
    RO_INIT_SINGLETHREADED = 0,
    RO_INIT_MULTITHREADED = 1
}

// uuid("af86e2e0-b12d-4c6a-9c5a-d7aa65101e90")
extern(Windows)
interface IInspectable : IUnknown
{
    HRESULT GetIids(uint* iidCount, GUID** iids);
    HRESULT GetRuntimeClassName(HSTRING* className);
    HRESULT GetTrustLevel(int* trustLevel);
}

alias HSTRING = HANDLE;

extern(Windows)
{
    HRESULT WindowsCreateString(LPCWSTR ptr, UINT32 len, HSTRING* out_);
    HRESULT WindowsDeleteString(HSTRING str);
}

HSTRING toHSTRING(wstring text)
{
    HSTRING h;
    WindowsCreateString(text.ptr, cast(uint)text.length, &h);
    return h;
}

// uuid("33f59b01-5325-43ab-9ab3-bdae440e4121")
// WinrtFactory("Windows.UI.Popups.MessageDialog")
interface IMessageDialog : IInspectable
{
extern(Windows):
    HRESULT get_Title();//(HSTRING* return_value);
    HRESULT set_Title();//(HSTRING value);
    HRESULT get_Commands();//(IVector!(IUICommand)* return_value);
    HRESULT get_DefaultCommandIndex();//(UINT32* return_value);
    HRESULT set_DefaultCommandIndex();//(UINT32 value);
    HRESULT get_CancelCommandIndex();//(UINT32* return_value);
    HRESULT set_CancelCommandIndex();//(UINT32 value);
    HRESULT get_Content();//(HSTRING* return_value);
    HRESULT set_Content();//(HSTRING value);
    HRESULT abi_ShowAsync(IAsyncOperation!(IUICommand)* return_messageDialogAsyncOperation);
    HRESULT get_Options();//(MessageDialogOptions* return_value);
    HRESULT set_Options();//(MessageDialogOptions value);
}

const IID IID_IMessageDialogFactory = guidFromUUID("2d161777-a66f-4ea5-bb87-793ffa4941f2");

// uuid("2d161777-a66f-4ea5-bb87-793ffa4941f2")
// WinrtFactory("Windows.UI.Popups.MessageDialog")
interface IMessageDialogFactory : IInspectable
{
extern(Windows):
    HRESULT abi_Create(HSTRING content, IMessageDialog* return_messageDialog);
    HRESULT abi_CreateWithTitle(HSTRING content, HSTRING title, IMessageDialog* return_messageDialog);
}

extern(C) extern const IID IID_IAsyncInfo;

// uuid("00000036-0000-0000-c000-000000000046")
interface IAsyncInfo : IInspectable
{
extern(Windows):
    HRESULT get_Id(uint* id);
    HRESULT get_Status(AsyncStatus* status);
    HRESULT get_ErrorCode(HRESULT* errorCode);
    HRESULT abi_Cancel();
    HRESULT abi_Close();
}

enum AsyncStatus : int
{
    Started = 0,
    Completed,
    Canceled,
    Error,
}

interface IAsyncOperation(TResult) : IInspectable
{
extern(Windows):
    HRESULT set_Completed();//(AsyncOperationCompletedHandler!(TResult) handler);
    HRESULT get_Completed();//(AsyncOperationCompletedHandler!(TResult)* return_handler);
    HRESULT get_Results(TResult* return_results);
}

// uuid("4FF93A75-4145-47FF-AC7F-DFF1C1FA5B0F")
interface IUICommand : IInspectable
{
extern(Windows):
    HRESULT get_Label();//(HSTRING* value);
    HRESULT set_Label();//(HSTRING value);
    HRESULT get_Invoked();//(UICommandInvokedHandler* value);
    HRESULT set_Invoked();//(UICommandInvokedHandler value);
    HRESULT get_Id();//(IInspectable* value);
    HRESULT set_Id();//(IInspectable value);
}

extern(C) extern const IID IID_IInitializeWithWindow;

// uuid("3E68D4BD-7135-4D10-8018-9FB6D9F33FA1")
interface IInitializeWithWindow : IUnknown
{
extern(Windows):
    HRESULT Initialize(HWND hwnd);
}

GUID guidFromUUID(string uuidString)
{
    static import std.uuid;
    std.uuid.UUID uuid = std.uuid.UUID(uuidString);
    ubyte[8] data = uuid.data[8 .. $];
    return GUID(uuid.data[0] << 24 | uuid.data[1] << 16 | uuid.data[2] << 8 | uuid.data[3], uuid.data[4] << 8 | uuid.data[5], uuid.data[6] << 8 | uuid.data[7], data);
}

class ComException : Exception
{
    this(string msg, string file = __FILE__, int line = __LINE__)
    {
        super(msg, file, line);
    }
}

struct ComPtr(BaseType : IUnknown)
{
    this(BaseType comPtr)
    {
        _comObj = comPtr;
    }
    this(ref ComPtr!BaseType comPtr)
    {
        _comObj = comPtr._comObj;
        _comObj.AddRef();
    }
    ~this()
    {
        if (!_comObj) return;
        _comObj.Release();
        _comObj = null;
    }
    ComPtr!TargetType as(TargetType)(IID* riid)
    {
        TargetType target;
        HRESULT hr = _comObj.QueryInterface(riid, cast(void**)&target);
        if (hr < 0)
            throw new ComException("ComPtr.as is failed.");
        return ComPtr!TargetType(target);
    }
    @property BaseType handle()
    {
        return _comObj;
    }
    @property BaseType* ptr()
    {
        return &_comObj;
    }
    alias handle this;
private:
    BaseType _comObj;
}

void main()
{
    HRESULT hr = RoInitialize(RO_INIT_TYPE.RO_INIT_SINGLETHREADED);
    if (FAILED(hr)) return;
    scope(exit) RoUninitialize();

    HSTRING msgDialogFactoryClsid = toHSTRING("Windows.UI.Popups.MessageDialog");
    scope(exit) WindowsDeleteString(msgDialogFactoryClsid);
    ComPtr!IMessageDialogFactory msgDialogFactory;
    RoGetActivationFactory(msgDialogFactoryClsid, &IID_IMessageDialogFactory, cast(void**)msgDialogFactory.ptr);

    HSTRING content = toHSTRING("Hello D/WinRT!");
    scope(exit) WindowsDeleteString(content);
    HSTRING title = toHSTRING("D/WinRT Dialog");
    scope(exit) WindowsDeleteString(title);
    ComPtr!IMessageDialog msgDlg;
    msgDialogFactory.abi_CreateWithTitle(content, title, msgDlg.ptr);

    ComPtr!IInitializeWithWindow pDesktopWindow = msgDlg.as!IInitializeWithWindow(&IID_IInitializeWithWindow);
    hr = pDesktopWindow.Initialize(GetDesktopWindow());
    if (FAILED(hr)) return;

    ComPtr!(IAsyncOperation!(IUICommand)) operation;
    hr = msgDlg.abi_ShowAsync(operation.ptr);
    if (FAILED(hr)) return;

    ComPtr!IAsyncInfo info = operation.as!IAsyncInfo(&IID_IAsyncInfo);

    while (true)
    {
        AsyncStatus status;
        hr = info.get_Status(&status);
        if (FAILED(hr)) break;
        if (status != AsyncStatus.Started) break;

        MSG msg;
        while (PeekMessage(&msg, null, 0, 0, PM_REMOVE))
        {
            TranslateMessage(&msg);
            DispatchMessage(&msg);
        }

        Sleep(10);
    }
}
明日は総括とします。